Tracking a DeviceID for use in a Symantec DLP Policy


Overview

Symantec Endpoint Prevent for DLP has the ability to track and limit data being copied to removable storage (USB drives, etc.).  Within a DLP policy we can leverage the DeviceID of a removable storage device as either an inclusion or exclusion to our policy. This document will cover how to set it up.

Process

The first tool we need to leverage is “DeviceID.exe” which is a part of the Tools folder under the DLP agent source directory.  This executable will allow us to gather both the Device ID and the Regex that is needed for either the exclusion or inclusion.

This information is taken from the Help file for DLP and the DLP Admin Guide.

  1. Connect the USB Device to your computer
  2. From the command prompt navigate to the folder where the “Tools” directory is located
  3. Execute “DeviceID.exe” to get a list of the devices attached to your computerdevice id `1
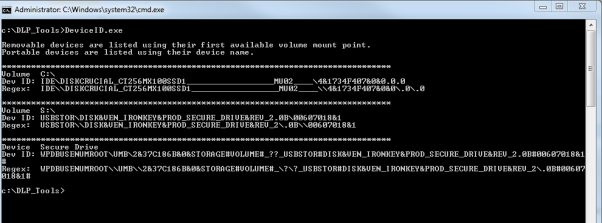
  4. There are two values displayed per device connected to your laptop/desktop
    1. Dev ID: Contains the full string for the device connected to your laptop
    2. Regex: The value we want to put in our exclusion or inclusion
    3. NOTE: If you have a large amount of devices attached to your laptop or desktop the output can be directed to a text file via “DeviceID.exe > textfile.txt”
  5. Open up the DLP Console and navigate to System -> Agents -> Endpoint Devicesdevice id 2
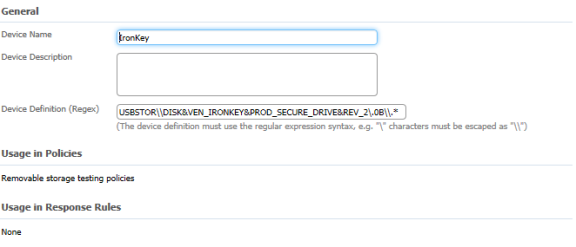
  6. Select “Add Device” and fill out the form
    1. Note: Use the Regex value from DeviceID to fill out the device definition portion of things
    2. NOTE: The goal is to be both as generic and specific as possible to make sure there is not a giant list of device ids

device id 3

Leveraging the DeviceID in a DLP Policy

Once the DeviceID is created it can be used as either an exclusion or an inclusion within the policy

  1. Login to the DLP Console
  2. Navigate to Policy Portion (Policy -> Policy List)
  3. Edit (or create) the policy you would like to use this in
  4. Select “Add Exception”
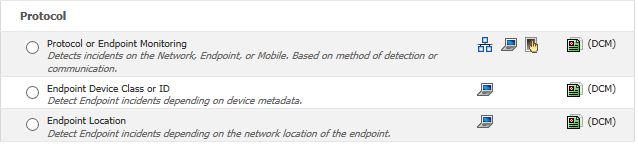
    1. Towards the bottom of the Exception Type is “Endpoint Device Class or ID”
      1. Select this option and select “Next”
      2. device id 4
      3. Select the DeviceID you would like to use for an exclusion and select next
      4. device id 5
      5. Select “OK” to save your exception
  5. NOTE: This same process can be used to create an inclusion in your DLP Policy as well


Configuring Box.com scanning in Data Insight 5.0

Overview

In version 14 of their DLP product Symantec introduced the ability to scan corporate Box.com accounts via Network Discover to see what confidential data is stored within an organization’s Box.com environment. In Data Insight 5.0 we now have the ability to process Box.com to understand the context of the files in our Box.com account.

In previous posts I covered:

This guide will cover configuring Box.com scanning and then also provide some screenshots around what it looks like.

How it works

After logging into the Data Insight Console we will need to access the Settings tab of the Management Console to setup our “Cloud Sources” which can be found on the left side of the Console.

data insight box 21

In the above screenshot (Figure 1) it shows there is one Cloud Service enabled and we would like to add an additional source by clicking on “Add a new cloud service.” (While I have not seen an official roadmap, I would assume additional services are forthcoming.)

data insight box. 1PNG

In order to perform the scanning, we will need to authorize the account against the Box.com API

data insight box

In order to process everything correctly, make sure the owner account is used to connect and use the system. The above screenshot (Figure 3) shows the demo system being authenticated to the system.
One the indexer and collecter are assigned, we can then start the scanning of the Box.com account.

Examples

Now that the Cloud Source is configured we can start the Data Insight scan (or wait for the normal schedule). In the below figure (Figure 4) we have clicked on the “Actions” drop down and have selected “Scan Now.”

data insight box 4

Once the scan has been completed and the information has been processed, Box.com information will be in the Data Insight system.

data insight box 5

Figure 5 shows the result of the scan against the demo system.

Configuring a Tagging Response Rule for Box.com in DLP 14

Overview

New in DLP 14 is the ability to scan Box.com for confidential data that may be stored in an enterprise’s BOX.COM environment.  See this post for more information on how to configure this.

This post will cover how to configure the the response rule.

Configuring the Response Rule

The first step to configure the response rule is to enable the response rules for scanning within the Discover Target.  If the check box is not enabled the response rule will not trigger.

box remediation

The response rule needs to be created and then assigned to the policy in order for it to work. Within the system add a new response rule and select the type “Automatic.”

box response rule

What this looks like

The incident report will show a new icon (the tag) next to the Box.com incident.incident report

The incident snapshot shows further information in regards to the tagging response rule showing up

incident detail

Finally we can see the “Visual Tag” applied within the Box.com interface.

visual tag

Configuring a Box.com Network Discover Scan in DLP 14

Overview

New to Symantec DLP 14 we have the ability to do Network Discover Scans (Data at Rest) of content that is stored in Cloud Storage locations.  The first service this is available for is Box.com.

This post will cover how to configure a Network Discover Scan for Cloud Storage once you have applied the Cloud Storage License.

Steps to create a Box.com Discover Scan

Once the license for Cloud Storage DLP is loaded into the system a new entry to create a Box.com Discover Target will be listed.

Once the license for Cloud Storage DLP is loaded in the system a new entry to create a Box.com Discover Target will be listed./

  1. Navigate to Manage -> Discover Scanning -> Discover Targets
  2. Under the drop down for “New Target” select Box
  3. new target

  4. Just like any Discover Target configure the target with Name, Scan Type and Schedule under the “General Settings.”
  5. We need to Authorize the Box.com scanning account which is new
    1. Click on the authorize button
    2. box pre ath

    3. Provide the username and password for the Administrator of your Box.com environment and click Authorize
    4. The DLP system will be authorized for 60 days and after that time the system can be reauthorized
    5. box authorization

  6. Within the Box.com scan we can filter out which files within the Box environment can be scanned within the box.com environment and the filters tab allows us to control this
  7. box filtering

  8. Along with being able to scan a folder on box.com we have the ability to “tag” a file with a response rule and this needs to be enabled in the protect tab of things.
    1. A separate blog post will cover this

Once this is all done, a Cloud Storage Target for Box.com will be configured and setup.  THis target can then be run just like any network discover target.

Do I need a different license for this?

Yes, a license for “Cloud Storage DLP” according to the DLP Licensing Guide.  This is a subscription based license available in a 1-year subscription.


Invalid Username and Password when trying to process the DLP IT Analytics Cubes

The problem:

Recently I was installing the stand-alone version of IT Analytics and the DLP Cubes and kept running into problems processing the cubes in regards to invalid username and password.  When the cubes were processed within IT Analytics a large error was created but the full text was not generated.  So I jumped in SQL Management Studio, connected to the Analysis Services, found my DLP Cubes and tried to process them.  It was within SQL Management Studio and found I was getting an error with invalid username and password.

This error message confused me as I was using the same account that I installed SQL with and installed IT Analytics with.  So I tried some troubleshooting and checked various roles within SQL and checked what permissions were set on the Database, Analysis Services, etc.
And it was time to panic, I had a demo today at a new to me customer and needed to have strong showing…. So it was off to Symantec Support to try and resolve the problem.  I had great success getting my incident resolved at 3:26pm EST when my demo started at 3:30pm EST.

So here’s the solution

The solution to my problem:

The first part that was wrong with my installation and configuration was I did not read the installation manual all the way to the end and missed a step.  Also there was another step that needed to be changed.

NOTE:  After making these changes you will need to restart your SQL Server Services to make sure everything is updated and fixed correctly.

Changes made to the provider

This first step is documented in the install guide and I just did not read all the way through it.  The OraOLEDB.Oracle  provider needs to have a setting changed in order for the processing to work.  We need to select “Allow inprocess” in order for the cubes to process correctly.

In SQL Management Studio, connect to the Database portion of your server and then we need to find the list of providers.  This is found under “Server Objects -> Linked Servers -> Providers and then right click on the OraOLEDB.Oracle provider and select properties.

Screen Shot 2015-07-13 at 2.54.45 PM

As shown in the screenshot, we need to select “Allow inprocess.”  Check this box and select “OK”

Changes made to the Data Source

The next change that needs to be made to the ITAnalytics Data Source.  This setting is found under the Analysis Server portion of your SQL Server.  If you already closed Management Studio, you will need to reopen it up and connect to the Analysis Server, if it is still open connect to the Analysis Server.  Under Databases find the ITAnalytics Database and expand “Data Sources” where you will find a listing for the “ITAnalytics” Data Source.  Right-click and select properties and you should see something that looks like the following screenshot

Screen Shot 2015-07-13 at 3.00.58 PM

What we will change is the “Security Settings from “Default” to the service account we are using for IT Analytics.  When you click on the “…” a new window will open up, select “Use a specific Windows user name and password” and provide the correct information.  My system looks like the following screenshot

Screen Shot 2015-07-13 at 3.03.08 PM

Restart the SQL Server Services and your DLP cubes will process correctly.

If you are using Symantec DLP, you should be using IT Analytics

Overview of IT Analytics

IT Analytics provides cube based reporting (pivot tables), additional reports, and Key Peformance Indicators (KPIs) for various Symantec products:

  1. Symantec IT Management Suite (Altiris)
  2. Symantec Data Loss Prevention (DLP)
  3. Symantec Critical Systems Protection (CSP)
  4. Symantec Endpoint Protection (SEP)

IT Analytics is developed by Bay Dynamics but is available as part of your Symantec license.  For more information visit: http://baydymanics.com/Products/ITAnalytics/Symantec/

One of the concerns in the past for using IT Analytics has been the requirement for a Symantec Management Platform (SMP also known as Altiris) to be configured first before you install and manage the cubes.  This is no loner the case as there is a stand-alone version of IT Analytics available (this will be covered in a separate blog post).  This post will cover why you should be using IT Analytics for your DLP system.

Why IT Analytics for Symantec DLP

Within the Symantec DLP console there are a bunch of ways to slice and dice the data that is generated in the system (Incidents, etc.) either by filtering the data or by creating various summarizations of the data.  IT Analytics adds several items that are not exposed without having to write a SQL query or leverage the API.  IT Analytics allows for someone who does not have access to the DLP console to run reports against the information.  Also IT Analytics can easily create trending reports to demonstrate how risk is being reduced over time.

Whenever people ask me why I should bother with IT Analytics there are two reports that I point to that demonstrate the value of IT Analytics.

User Action Audting

User Login Report

User Action Auditing - User Action Audting

User Action Auditing Report

The first screenshot (User Login Report) shows which users have logged into the DLP system and the second report (User Action Auditing Report) shows who has changed what policies in the DLP system.  These two reports are requested over and over by customers.  How can I prove to my auditors or management that no one is changing a DLP policy randomly?  This information is coming out of the Oracle Database but without ITA you would have to write a SQL statement and then clean it up to provide auditors or management.

Incident Trend by Product Area

Incident Trend By Product Area

A third common request is “how can I show trends” in my DLP system and the above screenshot shows this trend.

Finally IT Analytics provides Key Performance Indicators (both predefined or custom created) demonstrate how your Symantec DLP system is reducing risk over time and how the system is performing.Key Performance Indicators

How do  I get IT Analytics?

IT Analytics is provided free of charge however a license key and the MSI is needed before you can install ITA..  If you have Symantec Endpoint Protection in your environment the MSI for performing the installation is located on the Tools portion of the media.  However if you are not a SEP customer, please contact either your Symantec Account Manager or Bay Dynamics.  NOTE:  MY company (ITS Partners) can help you obtain the license

Can I install Symantec DLP on a Red Hat Linux system with a pre-defined user name?

Recently I was doing an install of Symantec DLP on a Red Hat Linux box that was a member of LDAP and had the /home folder automounted and didn’t allow for us to write to that folder.  When a new local user was created via the adduser command it would not work without passing a command line option to change the location of the home directory (adduser -b /opt/users/).

During the install of Symantec DLP, the installer creates a user (protect, protect_update) and would fail because the home directory (/home/protect) could not be created.

So the question was asked… Can we create a user, populate the home directory outside of /home and then perform the install of the system?

Answer:  No… The installer for Symantec DLP needs to create the correct users and must be able to write /home when creating the user.  There is currently an enhancement request within Symantec to allow a pre-created account.

4.5 Cool Things about Data Insight 4.5

Symantec Data Insight (DI) can help customers who struggle ith identifying data users and owners for their unstructured data.  DI helps a customer answer the following questions:

  1. Who owns the data?
  2. Who is responsible for remediation of that data?
  3. Who has seen the data?
  4. Who has access to the data?
  5. What data is most at risk?

So what’s new in Data Insight 4.5?  Here are 4.5 (get it???) things that I find awesome in this release:

  1. Self service portal to help make remediation easier:  A portal that allows data owners and/or custodians of data to be able to remediate items directly potentially without the need for IT Security.  Actions can come from either the Data Loss Prevention (Enforce) Console or the Data Insight Management Server depending on the workflow.  A custom can create workflows that are specific to their own environment or use one of the pre-defined workflows such as:
  • Entitlement Review: Review the user permissions on the folders and suggest changes to the permissions
  • DLP Incident Management: Review policy actions and take actions on the files that violate DLP policies without having accounts on the Enforce Console.  Actions are Smart Response Rules that are used to remediate the items that violate a DLP policy.  An example would be triggering a Smart Response rule to encrypt a specific file.
  • Ownership Confirmation: Confirm the ownership of files or folders.  DI will infer the ownershiop of a file, this lets you confirm the file is actually yours.

This portal will be installed on a separate server from the Data Insight Management Console, is a separate                   license and requires DLP 12.5 or higher to be installed.

  1. Additional supported platforms for filers: Data Insight 4.5 now supports the monitoring of NetApp Cluster Mode, EMC Isilon, and Windows Server 2012.  Table 2-4 in the Data Insight Release Notes covers the supported platforms for DI 4.5.
  2. Enhanced Reporting with Data Insight:  There have been improvements and changes to reporting with the addition of some enhanced reports including:
    1. Reports based on User Reporting including the ability to track unresolved or migrated SIDs
    • Additional charts and statistics to help understand what is happening on the Data Insight server(s) in your environment
    • A Health Audit report that runs automatically at 5am that helps you and Symantec Support (if needed) understand any issues in the Data Insight environment.
  1. Enhanced data owner computation: Data Insight can calculate the the owner of a file and then populate that within the DLP console.  In DI 4.5 we can exclude deleted or disabled users (or their SID) when calculating the actual Data Owner.  However if you would like to still display this you can show it on the Inferred Owner report.
  2. Data Insight now provides an API specification for the Data Insight Query Language (DQL): The DQL provides a way to extract and interface with Data Insight data.  This is now available vian an API so you can integrate with 3rd party applications.


Welcome back Hex!!!

Years ago I posted about missing Hexonyx and how much I missed that mud.  Over the years the post has generated a number of comments and posts.

One of those comments lead me to this Facebook group and the best part is the mud is back.  So fire up ZMUD or whatever client you are were using so many years ago and join back up.

Bad news is the player file is a bit out of date and you probably don’t have that awesome weapon or awesome piece of quest gear you had last, but come back the memory is still there and just like riding a bike you will quickly be running zones and joining with friends.

Also for a great story of how Hex landed someone a job read here

Configuring User Risk Reporting in Symantec DLP

The User Risk Summary report breaks down incidents based on User and covers email and endpoint incidents  From the help file: “The user risk summary gives you insight into the behavior of specific individuals in your organization by associating users with email and endpoint incidents. This information helps you focus your data loss prevention efforts on those users posing the highest risk to the security of your data.”

There are 3 steps to take in order for the user risk summary report is displayed:

  1. Create custom user attributes
  2. Import user data
  3. View the reports

Create Custom User Attributes

One item to keep clear is the attributes defined here are different then the custom attributes populated by Active Directory as a part of an Incident  These attributes need to be created outside  This has lead to a lot of confusion on my part but needs to be setup

To setup the custom attributes for User Risk Reporting navigate to System -> Users -> Attributes  By default there are now attributes in the system

To add new attribute, select “Add” and then type in the Attribute Name (example: First Name or Department)  These attributes will be populated by the data source (either Active Directory or a CSV file)

The screenshots shows the attributes that are populated in my demo system

Image

Import User Data

Once again this is different than populating the data for incident and needs to be configured separately  We can leverage the existing directory connection that is already being used, or create a new data source

This is found under System -> Users -> Data Sources

Selecting Add presents you with this screenshot

Image

As you can seem I’m using the existing Directory Connection already created, but after I provide a name the data source is ready

Check the box next to the data source and select “Import” to run the import  After the import is complete information will be presented on the User Risk Summary report (if you have incidents)

View the reports

User risk reports will group the Network Incidents and the Endpoint Discover incidents together  These reports will break the incidents down based on severity

Image

If the user is selected then it will present further detail about the types of generated

Image